Showing posts with label Small Plates. Show all posts

Thursday, December 13, 2012

Chicken Marbella recreated into cocktail food for a party buffet


Through the years I’ve made Chicken Marbella many times for dinner parties and it’s always a crowd pleaser. With its irresistible and alluring flavors, the chicken with pieces of dark fruit, green olives and capers scattered over, napped with a slightly sweet and savory sauce, the inevitable question poised at the dinner table is always, “What IS this? It’s fantastic.”

Well, start with lots of garlic, vinegar, oregano, brown sugar, wine, capers and briny green olives, dried prunes, or plums as they are now called, and marinate with chicken overnight. Bake in the oven and it couldn’t be an easier dish to prepare. It practically makes itself. It’s perfect served hot, at room temperature, or cold. Could you ask for anything more?

Chicken Marbella was one of the most popular recipes ever to come from the wildly successful Silver Palate Cookbook, which recently published its 25 anniversary edition. The original recipe called for cut up chicken, but in today’s world, if I were making it for a dinner party, I would probably use boneless, skinless chicken thighs or cut in half bone-in chicken breasts. If you're serving it for a dinner party, it is excellent over couscous or rice with baby English peas. A nice accompaniment is an French fresh orange salad, link to recipe here.


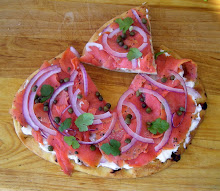
But herein is our dilemma. We needed a dish to take to our condo’s Christmas party at the pool the other night and it needed to be a dish that people would be able to serve themselves in small portions, hold up well on a buffet, and allow to be eaten with one of those pitiful plastic forks they invariably give you as these kinds of events. Thus the reincarnation of Chicken Marbella that I present today. Sliced chicken breasts seemed like the perfect solution and it was. Everyone raved about it, as what always happens when you serve Chicken Marbella. Even 25 years since The Silver Palate first published this recipe, there are still those among us who have never, ever tasted Chicken Marbella and some of them were at this party. There’s no shame in that. It's fun to introduce new people to Chicken Marbella. But their first reaction is still the same as it’s always been – “What IS this? It’s fantastic.”

Make people happy - serve this at your next buffet. Nothing could be easier or more of a “people pleaser” than the intriguing and exotic Chicken Marbella. I don’t know anyone who doesn’t love this dish and it always distinguishes itself among the other buffet offerings “the very best of the best.”


Chicken Marbella recreated into cocktail food for a party buffet
Adapted From The Silver Palate Cookbook

6 large plump boneless skinless chicken breasts halves
½ head of garlic, peeled & finely pureed
¼ cup dried oregano
Kosher salt & freshly ground pepper to taste
½ cup red wine vinegar
½ cup extra virgin olive oil
1 cup pitted dried prunes or dried plums as they are now called, bite size preferred, or large ones cut in bite size pieces
½ cup pitted Spanish green olives
½ cup capers with a bit of juice
6 bay leaves
1 cup brown sugar
1 cup dry white wine
¼ cup Italian parsley or fresh coriander (cilantro), finely chopped

In a large bowl combine chicken, garlic, oregano, pepper and coarse salt to taste, vinegar, olive oil, prunes, olives, capers & juice and bay leaves. Cover and let marinate, refrigerated, overnight.

Preheat oven to 350 degrees F.

Arrange chicken in a single layer in one or two large, shallow baking pans and spoon marinade over it evenly. Sprinkle chicken with brown sugar and pour white wine around the chicken. Bake for 50 minutes to 1 hour, basting frequently with pan juices. Chicken is done when it registers 160 degrees F on an oven thermometer.

Remove the chicken breasts and slice into serving pieces. Transfer sliced chicken, and with a slotted spoon, transfer prunes, olives and capers over chicken to a serving platter. Discard the bay leaves. Moisten the chicken with a few spoonfuls of pan juices and sprinkle generously with parsley or cilantro. Pass remaining pan juices in a sauce boat.

Good served hot, at room temperature, or cold. To serve cold, cool to room temperature in cooking juices before transferring to a serving platter. If chicken has been covered and refrigerated, allow it to return to room temperature before serving. Spoon some of the reserved juice over chicken.

Notes: Don’t skip the overnight marinating; it’s essential for flavor. If in a hurry, marinate at least 4 hours. To turn back into the original recipe, use two whole chickens cut into serving pieces, or quartered, or any combination of chicken parts, including halved breasts or all thighs. Either version is good hot, cold or room temperature.


This will be shared with Foodie Friday at Rattlebridge Farms, Miz Helen’s Country Kitchen Full Plate Thursday, Foodie Friday at Simple Recipes, Foodtastic Friday at Not Your Ordinary Recipes, and On the Menu Monday at Stone Gable.

Have a great weekend everyone.

Thursday, August 23, 2012

Pheasant Eggs on Sausage Toast – a Very Special Treat


Pheasant eggs you say. Where on earth did you find pheasant eggs? Actually we started out looking for banty eggs, which are tiny eggs laid from a Bantam chicken. Here in the mountains we buy organic eggs or in some areas what are called “yard eggs” from a local vendor. We were visiting with her one day about eggs and she mentioned that occasionally she gets tiny banty eggs and asked if we would like some. Of course we replied, save some for us the next time you have them. I was intrigued with using the tiny eggs in a recipe and we talked about ideas on the way home. As luck would have it, every time we asked about the banty eggs she said the chickens were molting right now and she didn’t have any. (If the word molting and the laying habits of hens when they lose their feathers are as new to you as they are to me, here’s more information.)

After that, we just put the idea of small eggs on the back burner until we were at our local farmer’s market a couple of weeks ago. My husband Meakin was visiting with a vendor who sells produce, eggs, and flowers and on a lark he asked if he happed to have any banty eggs. Much to our surprise he did, but apologetically said that he had only one. But, he added, he also had four pheasant eggs. Bingo, we finally found some tiny eggs.

As you can see by this picture, banty eggs (or bantam eggs as they are also called) are smaller than a large hen egg and pheasant eggs are even smaller than the banty.


The pheasant eggs are khaki-colored and quite pretty. Compared to a hen egg, pheasant eggs and banty eggs have a higher yolk-to-white ratio, thus producing a richer flavor.


If you would like to see what a pheasant looks like, here’s a link along with some tips on cooking their eggs.

This recipe is what I call a “small plate” meal. It also makes a lovely appetizer to pass on a tray at a party. If you can’t find pheasant or banty (bantam) eggs, quail eggs will work very well also.


If you do use tiny eggs, use them in a way that shows them off and puts them on center stage. They make a great conversation piece at get-togethers. But please promise me - no scrambled eggs. They are much too special to use as ordinary eggs.

I hope you enjoy this unusual and attractive treat. If you have used any kind of tiny eggs in recipes, please share your experiences with us.

Join me next time as we visit our Saturday Farmer’s Market that’s typical of a North Carolina mountain town to see what’s offered by local farmers and craftsmen of our region.


Pheasant Eggs on Sausage Toast
Adapted from The Tapas Cookbook – serves 6 as part of a tapas meal

12 slices French bread, cut on the diagonal, about ¼” thick, toasted
24 slices ready-to-eat smoked sausage or Spanish chorizo, cut into thin pieces on the diagonal to fit the toasts, and browned on both sides in a skillet
Olive oil
12 pheasant eggs (or banty or quail eggs)
Smoked sweet Spanish paprika, also called Pimention de la Vera (or substitute mild Hungarian paprika)
Crunchy sea salt
Freshly ground black pepper

Heat a thin layer of oil in a large skillet over medium heat. Break the eggs into the skillet and cook, spooning the fat over the yolks, until the whites are set and the yolks are cooked to your liking sunny side up. Remove the cooked eggs from the skillet and drain on paper towels. Top each piece of toast with browned pieces of sausage. Immediately transfer the eggs to the sausage-topped toasts and dust with paprika. Sprinkle with crunchy salt and lots of freshly ground pepper. Serve at once.


This recipe is being linked to Foodie Friday at Rattlebridge Farms, Miz Helen’s Country Kitchen Full Plate Thursday, Foodie Friday at Simple Recipes, Foodtastic Friday at Not Your Ordinary Recipes, Seasonal Sunday at The Tablescaper, Southern Sundays at Slice of Southern, and On the Menu Monday at Stone Gable.

Have a great weekend everyone. And keep your eyes out for tiny eggs.


Thursday, May 17, 2012

Mediterranean Tuna Salad and a Give-away


This Mediterranean tuna salad is a super easy to put together as a small plate meal or a filling appetizer. Made mostly from ingredients that you already have on your shelf, all you need to complete the recipe is a handful of fresh parsley, a juicy lemon, and a box of crispy crackers. It doesn’t get any easier than that.

Instead of using the predictable celery and mayonnaise, this version of tuna salad is mixed with fresh herbs, roasted red peppers, and white beans. You might say it’s a sophisticated tuna salad tossed with flavors from the Mediterranean.


Mediterranean Tuna Salad 
You Can Trust a Skinny Cook by Allison Fishman – serves 4

1- 15 ½ ounce can small white beans, rinsed and drained well
2- 5 oz cans Italian tuna in oil, drained (or any good tuna)
1 cup roughly chopped fresh flat-leaf parsley
1 cup roasted red peppers, rinsed, drained, and sliced
1 tablespoon capers, rinsed and drained
3 tablespoons extra-virgin olive oil
Juice of ½ lemon
Kosher salt and freshly ground black pepper
4 crisp hearty crackers or slices of a French baguette

In a medium bowl, combine the white beans, tuna, parsley, red peppers, and capers and toss well to combine. Drizzle with the olive oil and lemon juice, toss gently, and season to taste with the salt and pepper. Serve with crisp hearty crackers or crisp bread.


In celebration of my 500th follower, I thought a petite give-away was in order.  Since I know many of you enjoy reading about France as much as I do, the perfect book to show my appreciation of your reading my blog had to be a copy of the delightful book Paris was Ours by Penelope Rowlands. The book is an accumulation of thirty-two diverse writer’s stories about how they were outsiders who became insiders in the City of Light. They share their observations and revelations about the world’s most seductive city.


From Patricia Well’s husband Walter, “Much of the early immigrant experience was often entertaining, but it was also hard. We both cried the first night I came home from the Tribune and found Patricia already in tears. I realized how lonely she was and remember saying to her, “This is the worst mistake I have ever made and it’s the worst time of my life.” 

From David Lebowitz, “I know for sure I’ve made it here when I buy outfits specifically for taking out the garbage.” 

From Veronique Vienne, “Parisians approach parting with money as they do foreplay: with plenty of time to spare.”

The give-away is my way of saying thanks for following and supporting My Carolina Kitchen. The give-away is reserved for followers only and it also includes those who follow by email. If a reader outside the US wins, I will gladly ship it to you wherever you are. If you leave an Anonymous comment, please leave a way I can get in touch with you should you win. Their will be only one winner and the name will be announced this same time next week.

So the give-away is simple – if you are a follower, leave a comment saying so and also tell me if you would love to live in Paris and why.


This recipe is being shared with Foodie Friday at Rattlebridge Farm, Miz Helen’s Country Kitchen’s Full Plate Thursday, Foodie Friday at Not Your Ordinary Recipes, and On the Menu Monday at Stone Gable.

Wednesday, April 11, 2012

Tomato & Crispy Prosciutto Bruschetta – a Small Plate Lunch or a Filling Appetizer


Using briefly cooked tomatoes and crispy prosciutto as a base for toasted bread, the additions to this recipe are only limited by your imagination.  I added sliced Kalamata olives to give them a little “oomph,” but you could also top them with fresh mozzarella that you pop under the broiler to melt. Capers or finely chopped red onions would be a nice addition in the tomato mixture as well.

These little tomato and crispy prosciutto bruschetta bites make a nice light lunch which I call “small plates” or a filling appetizer. I caution you to go easy on the salt. The first time I made them I thought they were much too salty and I am a salt lover. Prosciutto and Parmesan cheese are salty all by themselves. In addition I salted the tomatoes as I sautéed them and then, as the recipe suggested, salted the bread before it went under the broiler. The instructions I’ve given below suggest that you salt the tomatoes lightly and I’ve eliminated salting the bread.

Have fun with this one and let your imagination be your guide. You don't have to wait for summer tomatoes. When cooked, plum tomatoes have a nice sweetness to them no matter what time of the year it is.


Tomato & Crispy Prosciutto Bruschetta
Adapted slightly from Tana’s Kitchen Secrets by Tana Ramsay- serves 4 as an appetizer or 2 as a light lunch

1 tablespoon olive oil, plus extra to drizzle
4 to 5 small plum tomatoes, sliced lengthwise into strips
½ tablespoon fresh oregano leaves, (or half that amount dried) or 1 tablespoon chopped fresh basil
2 tablespoons or more pitted and sliced Kalamata olives (optional)
1 tablespoon Italian balsamic vinegar
Sea salt and freshly ground black pepper
6 slices good prosciutto
1 garlic clove, halved
2 ciabatta rolls
¼ cup finely grated imported Parmesan cheese (not the stuff in the can)

Heat the oil in a nonstick skillet and toss in the tomatoes to warm through and break down slightly. Add the oregano, Kalamata olives, balsamic vinegar, a small pinch of salt, and a few cranks of freshly ground black pepper. (Take care not to over-salt the tomatoes because the prosciutto and Parmesan are salty.) Stir to combine, remove from the heat and allow to cool slightly.

Fry the prosciutto in a dry nonstick pan over a high heat until crispy and golden, then place on paper towels to blot off the excess oil.

Preheat the broiler to its highest setting. Slice the ciabatta rolls in half lengthwise. Drizzle a little olive oil over the ciabatta rolls and place under the broiler until golden brown. Remove from the oven and rub with the garlic. Crumble the prosciutto over the ciabatta, then spoon on the tomato mixture and sprinkle with the Parmesan cheese and some more black pepper. Serve hot. Serves four as an appetizer or two as a light lunch.

* * *

This recipe will be linked to Foodie Friday at Rattlebridge Farms (who is having a fabulous give-away), Miz Helen’s Country Kitchen Full Plate Thursday, Not Your Ordinary Recipes Foodie Friday, and On the Menu Monday at Stone Gable. Please stop by and visit these foodie get-togethers.

Thursday, March 29, 2012

Sea Scallops with Mint & Pea Puree – Fit for a Queen


There’s something about seared sea scallops that’s so special and fancy. Perhaps because to some of us they are a special treat. Served over this bright green mint and pea puree, they look very regal and fit for a Queen.

Scallops aren’t particularly difficult to prepare. You just need to be very careful not to overcook them, because if you do, they turn out tough and chewy and very unappetizing.

I think the most difficult thing about scallops is finding the correct ones. Dry pack scallops are the very best money can buy and I encourage you to seek them out. In some markets they are also called “diver scallops.” If at all possible you want to avoid scallops that have been soaked in brine. Why? Because they are very difficult to near impossible to brown properly and, to me, they leave a bit of a tangy aftertaste in your mouth. Scallops should smell and taste like the sea – fresh.

This is a great dish for guests because the mint and pea puree can be made the day before and stored, covered, in the refrigerator and reheated at the last minute while you are searing the scallops. The original recipe calls for serving 4 scallops per guest, but if you can find the big diver sea scallops as I’ve shown here, I think 3 per guests is ample. If you use this an appetizer, perhaps even 2 large scallops would be fine. Accompany with a nice chilled glass of white wine or a flute of champagne and raise a glass to the Queen.


Seared Sea Scallops with Mint & Pea Puree
Adapted slightly from The Lazy Gourmet – Magnificent Meals Made Easy by Robin Donovan & Juliana Gallin – serves 4 to 5

4 tablespoons extra-virgin olive oil, divided
1 medium shallot, peeled & minced
2 cloves of garlic, minced
¾ cup fish, chicken or vegetable broth
2 cups (about 10 ounces) frozen green peas
¼ cup lightly packed fresh mint leaves, plus more, julienned for garnish
½ cup sour cream (quality low fat sour cream works great)
¼ to ½ teaspoon wasabi paste
¼ teaspoon sugar
½ teaspoon kosher salt, plus more for seasoning scallops
¼ to ½ teaspoon freshly ground black pepper
3 tablespoons freshly squeezed lemon juice (juice of about 1 large lemon)
16 large dry packed sea scallops (about 1 ½ pounds), rinsed & patted dry

In a medium saucepan, heat 2 tablespoons of the olive oil over medium-high heat until hot but not smoking. Add the shallot and garlic and sauté until the shallot is soft and translucent, about 3 minutes, taking care not to burn either of them. Add the broth and bring to a boil. Add peas and return to a boil, reduce heat to medium-low, and simmer until peas are tender, about 5 minutes. Stir in mint, sour cream, wasabi paste, sugar, salt, pepper, and lemon juice. Using an immersion blender (or in batches in a countertop blender or food processor), puree the sauce until smooth. Taste and add additional salt and pepper if needed. Set aside while you sear the scallops. At this point if you wish, the puree can be made a couple of days ahead and stored, covered, in the refrigerator. Reheat in a saucepan before serving.

In a large, heavy skillet, heat remaining 2 tablespoons of olive oil over medium-high heat. When the oil is hot but not smoking, place the scallops in the pan, making sure they are not touching each other. You may have to sear the scallops in batches. Cook 2 to 3 minutes, without moving them around, until the bottoms form a crisp, caramel-colored crust. Turn and cook the other side the same way. (Cook’s note: Do not turn the scallops until they release from the pan or they will leave their nice sear behind.) Scallops are done when they feel springy, but not overly firm to the touch. Do not overcook or they will be dry and tough.

Reheat the pea puree in a saucepan over medium-low heat and add a touch more broth or water if it is too thick. Spoon onto four serving plates and arrange the scallops on top. Sprinkle with a little julienned mint or slivered green onion tops.


Friday, March 9, 2012

Spicy Shrimp – two ways to serve the same dish


Often when we think of shrimp, the first thing that comes to mind is “fried or boiled.” Well, that’s certainly not true anymore. Shrimp has come full circle and is as versatile as chicken.

This dish falls in what I call the “small plates” category, meaning a small informal yet chic meal that is healthy without leaving you feeling stuffed. These vividly seasoned shrimp are great on their own or served atop pasta. Leave the tails on for a prettier presentation.

One of the best parts about shrimp is that it’s healthy and good for you. Plus cooking time for shrimp is super speedy, making it perfect for quick and easy meals. The hands-on cooking time for this dish is 20 minutes, so in less than a half hour you can have dinner on the table.

The fun part about this spicy shrimp is that you can serve it two ways - with pasta or without, giving you some versatility.


Spicy Shrimp
Adapted from Cooking Light – serves 4 - 5

1 ½ pounds medium shrimp, peeled & deveined, preferably wild shrimp
¼ teaspoon Kosher salt
1 teaspoon sugar
1 tablespoon chili powder
½ teaspoon ground cumin
½ teaspoon ground coriander
½ teaspoon dried oregano
1 ½ tablespoons extra virgin olive oil, divided (or use avocado oil if available)
Lime wedges

Sprinkle shrimp with salt. Combine sugar, chili powder, cumin, coriander and oregano and lightly coat the shrimp with the spice mixture.

Heat a teaspoon of the oil in a large non-stick skillet over medium-high heat. When hot, add half of the shrimp and sauté 4 minutes or until done. Do not crowd the pan. Remove the shrimp from pan and repeat the procedure, adding 1 more teaspoon of oil before you add the remaining shrimp. Place shrimp on a platter and drizzle with remaining 2 ½ teaspoons oil. Serve with lime wedges. Serving with pasta extends the dish.


This recipe will be linked to Miz Helen’s Country Kitchen Full Plate ThursdayFoodie Friday at Designs by Gollum, and On the Menu Monday at Stone Gable.


Have a great weekend everyone.

Friday, December 30, 2011

Cranberry and Blue Cheese Crostini


I hope you’ve been enjoying the holidays and have found some time to relax a little. We’ve been on the road between homes and are back in sunny Florida where we’ll ring in the new year.

Our condo is having a little festive get-together around the pool for New Years Eve and I plan to take a Cranberry and Blue Cheese Crostini as an appetizer. The recipe is inspired by my friend Jann of Traveling Food Lady who recently featured a Honey Rosemary Cherry and Blue Cheese Crostini. Jann owns a touring company in Italy & France and has a wonderful blog. She recently took a group of ladies on a fabulous trip where they stayed in four star hotels and spent their time shopping, doing food and wine tastings (among other things) in the hill top villages all over Tuscany. Sounds like a dream trip doesn’t it?

I took Jann’s crostini idea and replaced her cherry mixture with my winey French cranberry sauce, and voila, a super easy holiday appetizer.

You could also serve the crostini as a chic little first course to a grander meal.  My French cranberry sauce recipe has appeared several times on my blog and all you need to complete the recipe is to toast some slices of a crusty French baguette, top the toast with fresh arugula, then a dab of cranberry sauce, and finish with a slice of good blue cheese and a crank of freshly ground black pepper. A little more cranberry sauce doesn't hurt on top either. For a festive touch, garnish with a sprig of holly from your garden or the florist.


I hope 2012 brings each of you good health, much happiness, and lots of delicious food. This year, as always, I will be making the same two New Year’s resolutions I make every year:

1 – Remember to think before speaking. Feelings are everywhere – be gentle.
2 – Do not eat anything in the kitchen while standing up. (Excludes tasting while I cook of course!)

Happy 2012 everyone. I’m curious - do you make new years’ resolutions or do you say forget it, they’re not worth it?


From the archives  - Ideas on how to Ring in the New Year with Good Luck

I will be linking this recipe to Foodie Friday at Designs by Gollum and Pink Saturday at How Sweet the Sound.

Thursday, October 6, 2011

Bruschetta with Sautéed Sweet Peppers and Creamy Gorgonzola


If you’ve been looking for a bruschetta that’s different from the normal tomato topping, look no further. The Barefoot Contessa has come to the rescue with this recipe for sautéed sweet peppers and creamy gorgonzola.

The peppers can be prepared in advance and the bruschetta assembled at the last minute, making it perfect for entertaining. It’s excellent not only as an appetizer, but also for lunch with soup or a salad.

I highly recommend slicing the peppers thinly so they fit on the toasted bruschetta and aren’t inclined to fall off. The creamy gorgonzola can be replaced with a soft, creamy goat cheese if you prefer. The combination of flavors is awesome and not too filling.

Another Barefoot Contessa winning recipe that’s not only beautiful to look at, but delicious as well. Thanks Ina.


Bruschetta with Sautéed Sweet Peppers and Creamy Gorgonzola
Adapted from Barefoot Contessa’s Back to Basics by Ina Garten

Extra-virgin olive oil
1 red bell pepper, seeded and sliced into thin strips
1 yellow bell pepper, seeded and sliced into thin strips
½ teaspoon sugar
Splash of good balsamic vinegar, optional, my addition, not Ina's
1 tablespoon capers, drained
2 tablespoons julienned fresh basil leaves
Kosher salt
Freshly ground black pepper
Crusty French baguette
3 ounces creamy gorgonzola cheese, or creamy goat cheese if you prefer, at room temperature

Preheat the oven to 375 degrees F. Heat 2 tablespoons of extra-virgin olive oil in a medium non-stick sauté pan over medium-high heat. Add the peppers and cook until soft, about 12 to 15 minutes. Sprinkle with the sugar and continue to cook for 2 more minutes. Add a splash of balsamic vinegar to deglaze the pan, then stir for a moment and add the capers, basil, and season with salt and freshly ground black pepper and give it a final stir. Can be made a couple of hours ahead at this point. Reheat gently when ready to make the bruschetta.

Slice the baguette crosswise into 18 thin round slices. Brush the bread rounds lightly with the olive oil on one side. Arrange them in rows, oil side up, on a sheet pan lined with parchment paper and toast in the oven until lightly browned, about 7 to 10 minutes.

Top each toast round with a teaspoon of the pepper mixture. Place 2 small pieces of cheese on top. Return the toast to the oven for 1 to 2 minutes and warm through. Serve right away. Makes 18 appetizers.


I am linking this recipe to Foodie Friday at Designs by Gollum and On the Menu Monday at Stone Gable.

Wednesday, September 28, 2011

Potato Latkes with Smoked Salmon, Crème Fraiche, and Caviar – or “How to Spoil Someone Rotten”


You may remember I said last week that while I’m recuperating Meakin was spoiling me rotten. Well, this is what “spoiled rotten” looks like.

Here my loving husband turned the simple potato latke into a decadent treat topped with smoked salmon, crème fraiche, and caviar. Latkes can also be served with applesauce or plain with a salad for lunch. Feel free to substitute sour cream for the crème fraiche if you can’t find it in your market. Or better yet, make your own with this super simple recipe using heavy whipping cream and buttermilk.

Warning. This is a very rich dish, so try not to overindulge. While I can’t claim it’s diet food, the good news is that the latkes are baked, not fried in oil as most recipes call for. You’ll be pleasantly surprised at how crisp the latkes are. If you like to do some of the work in advance, the latkes can be prepared ahead and stored, covered, in the refrigerator overnight and simply reheated in the oven the next day.

“Spoiled rotten” just got a whole lot easier.


Potato Latkes
Adapted from Eating Well

3 teaspoons neutral tasting oil, such as canola
2 lbs. russet potatoes, peeled
¾ cup finely chopped red onion (1 medium)
¼ cup all-purpose white flour
1 teaspoon kosher salt
¼ teaspoons freshly ground black pepper
1 large egg, lightly beaten
1 large egg white, lightly beaten

Set oven racks at middle and lower positions. Preheat the oven to 450 degrees F. Prepare 2 baking sheets by brushing each sheet with 1 teaspoon of the oil.

Using a shredding blade of a food processor or a hand grater, grate the potatoes. Place in a large bowl and add the onions, flour, salt, and pepper. Toss with clean hands to mix well. Add the egg, egg white, and the remaining 1 teaspoon oil, and toss again to mix.

Drop rounded tablespoonfuls of the potato mixture onto the prepared baking sheets and press lightly to form cakes. Bake for 10 minutes, or until golden brown on the bottom. Turn the latkes over, switch the position of the baking sheets, and bake for about 5 minutes longer, or until golden brown.

Transfer the latkes to a platter, arranging brown side up, and serve. Makes about 24 latkes. Top as desired, or serve plain. Latkes may be prepared ahead and stored, covered, in the refrigerator overnight. Reheat in the oven at 350 degrees F for 10 minutes.


Join me later in the week at Foodie Friday at Designs by Gollum, Pink Saturday at How Sweet the Sound, and On the Menu Monday at Stone Gable, where I will link this recipe.

Tuesday, August 2, 2011

An Easy Italian Appetizer - Savory Cantaloupe Salad


I just returned home from shopping in our picturesque little village in the hills of Lombardy. In my straw market bag I had a juicy melon so ripe I could smell it before I saw it. Also in my bag was a spicy soppressata salami, some creamy fresh goat cheese, and country bread, freshly baked by my neighbor Claudio.

Late in the afternoon as the sun began to set over the hills, I went into the kitchen of my villa and put together a little antipasto salad. I took the sweet, fragrant melon and cut it into bite size pieces, seasoned it with a pinch of sea salt and a few generous grinds of fresh black pepper, gave it a quick stir, and had a taste. Si, perfetto. I added a little olive oil, tossed the melon gently again, and then finished the salad with a splash of white wine vinegar.

In my little garden off of the terrace, I picked a few sprigs of fresh chives, returned to the kitchen, and used my scissors to snip them over the top off the salad. For a final garnish, I cut the salami into thin strips, and sprinkled them over the melon. To complete the antipasto plate, I spread fresh goat cheese on toasted slices of the country bread to serve alongside the melon salad. Now all I need to do is find that bottle of vino I’ve been saving for company.  


When I awoke from my dream, I found myself at home in my small town in the Blue Ridge Mountains of North Carolina, craving the little Italian savory antipasto melon salad from my dream. I looked down and in my lap was a copy of an old Food & Wine magazine. It was open to an article titled Instant Italy written by Lynne Rossetto Kasper and a recipe for savory cantaloupe salad.

For an appetizer that evening, I put together a melon salad in a similar manner as described above. I substituted freshly squeezed lime juice for the vinegar and slivers of summer sausage for the Italian soppressata salami called for in the original recipe because soppressata was not readily available. The salad was in one word – fantastico.The black pepper and lime juice together bring out the sweetness of the melon and the spicy salami gives the salad just the right amount of bite to it.


Next time I think I’ll go the extra mile and seek out authentic Italian soppressata salami instead of settling for supermarket summer sausage. But I have to say that if you can’t find soppressata, the summer sausage was a more than worthy substitute. I have since served the salad using fresh Italian basil in place of the chives and it was fabulous also.

Some opera music playing in the background would be perfect when you serve this appetizer. The Lombardy region of Italy is the birthplace of composer Guiseppe Verdi, one of the most famous and influential opera composers of the 19th century. A little La Traviata anyone?

Cantaloupe – it’s not just for breakfast anymore.

I will be linking this to
On the Menu Monday at Stone Gable

Friday, July 22, 2011

Open-faced Prosciutto and Plum Sandwich with Goat Cheese and Fig Preserves  


When we brought locally cured and aged prosciutto home from Benton’s Smoky Mountain Country Ham Smoke House in east Tennessee, I wanted to find a recipe that would show off its special flavors. I considered melon with prosciutto and while that’s a wonderful, tried and true appetizer, I wanted more bang for the bucks.

You would swear this open-faced sandwich was created by Ina Garten, the Barefoot Contessa, even though it happens to come from Cooking Light magazine. It’s that sophisticated. In fact it’s down right decedent, even though it weights in with only 318 calories a serving. This is a perfect example of what I call “small plates” that turn appetizers into light meals.

The sweet fig preserves are a perfect balance for the tangy goat cheese and the tart little plums in this open-faced sandwich. The tiny bit of grated fresh ginger brings a little mysterious flavor to the sandwich and really good prosciutto elevates it to food for the gods.


Open-faced Prosciutto and Plum Sandwich with Goat Cheese and Fig Preserves
From Cooking Light – serves 4

¼ cup fig preserves
1 tablespoon freshly squeezed lemon juice
¼ teaspoon peeled and grated fresh ginger
1/3 cup (3 ounces) soft goat cheese
4 slices country wheat bread, toasted
1 cup loosely packed fresh arugula
2 ripe plums, preferably a combination of red and purple, seeded and cut into thin wedges
3 ounces very thin slices of good prosciutto

Combine the fig preserves, lemon juice, and grated ginger in a small bowl and set aside. Spread the goat cheese evenly over each slice of toasted bread. Divide arugula, plum wedges, and prosciutto evenly over the four sandwiches. Drizzle each sandwich with about a tablespoon of the fig preserves mixture. Serves 4 (one sandwich each).

I use prosciutto often as a seasoning ingredient in dishes as such Chicken Marengo (my recipe here). Chicken Marengo is one of our “go-to” favorites when we crave real French comfort food, which is quite often actually.

Prosciutto is also the star of the show in two of my current favorite recipes:

Grilled country bread with prosciutto, melted cheese, and fresh basil - recipe


Asparagus and melon salad garnished with crispy prosciutto - recipe


I'm linking this to:
La Bella Vita's Fresh Food Friday
Foodie Friday at Designs by Gollum
On the Menu Monday at Stone Gable
Food on Friday at Carol's Chatter

Be sure to stop by and say hello. There are lots of recipes and great ideas to see. Enjoy!


Tuesday, March 8, 2011

Grilled Bread with Prosciutto Barefoot Contessa Style


This grilled bread with prosciutto recipe is in Ina Garten’s (The Barefoot Contessa) latest cookbook How Easy is That? Ina put it in the cocktails category, but for us it easily was dinner when we combined it with a green salad and a cold beer.

Since the recipe isn’t on the Food Network site yet, I’ll talk you through it below, with a few changes. I used regular fresh mozzarella cheese instead of the fresh smoked one that Ina called for because I couldn’t find smoked mozzarella. Ina grated the cheese, but what I bought was too soft to grate, so I broke it up into bits with my fingers. I also thought the dish needed a burst of fresh flavor, so I added fresh basil leaves in the layer between the cheese and the prosciutto.

Choose a good, sturdy bread and cut it into 6 slices. Grill or toast the bread in a toaster oven on one side until golden. Immediately rub the grilled side with a half of a slice of a large garlic clove. Ina recommends that if you like a real garlicky flavor, rub hard. We thought that the garlic really made it, so don’t skip this step. Drizzle each slice with a little extra virgin olive oil.

Crumble 2 ounces of fresh mozzarella cheese well with your fingers or grate it and divide it into six piles. Tear 2 ounces of Prosciutto de Parma and divide into six piles. To assemble, place one pile of the prosciutto on the grilled side of each bread slice. Slip in a fresh basil leaf or two, and top with crumbled mozzarella cheese. Return the bread to a hot grill or toaster oven to melt the cheese and cook for 1 to 2 minutes more. Remove the slices and drizzle with a little more extra virgin olive oil. Sprinkle with chopped fresh flat-leaf parsley, season to taste with a little kosher salt and freshly ground black pepper, and serve hot.


This is a rich appetizer, both in terms of taste and your wallet. When you are making a dish with only a few ingredients, it’s essential that you use only the finest of ingredients, which is what real Prosciutto de Parma is as opposed to the stuff you find in styro-packs at the grocery store hanging on a rack in the deli. It is also expensive. Combined with the melted mozzarella, this is a very rich and filling dish. As far as easy goes, Ina was right on with that. It took only a few minutes to put it together.

Would we serve it again? As much as I love Ina and trust her recipes and own all of her cookbooks, probably not on this one. The main reason is we felt that the mozzarella cheese overpowered the prosciutto and all we tasted was cheese. If I’m going to buy the good (and expensive) Prosciutto de Parma, I want to savor and taste every morsel. In all fairness, Ina called for prosciutto and did not specify Prosciutto de Parma. But would you really want to use the cheap stuff? Plus, the dish was, in our opinion, too heavy as an appetizer and would spoil your or your guest’s appetite for dinner.

Have you tried this recipe and, if so, what did you think of it?

Friday, February 11, 2011

Sexy Citrus Seafood Salad for Valentine’s Day


This vivid citrus shellfish salad is sexy looking with its beautifully browned sweet morsels of sea scallops, vibrant and juicy orange segments, slippery white pickled onions, and bright green parsley leaves. In winter when temperatures drop and the days are short, let this sun-soaked salad whisk you and your love away to a romantic tropical island beach for a quiet dinner alone on Valentine's Day. It can be put together in under thirty minutes, giving you time for more important things.


This is another dish that falls into the “small plate” category for a light, healthy meal. The ingredients are simple and you probably have a jar of pickled cocktail onions sitting in your refrigerator right now that you keep for martinis. I’ve used navel oranges, but ruby red grapefruit segments or blood oranges would also be lovely. Wild caught shrimp could easily stand in for the more pricy sea scallops.

When you select scallops, be sure to look for the dry-packed ones, as opposed to wet-packed scallops, which are sitting in phosphate brine.  Jay Harlow offers this advice from Sally’s Place on buying scallops. “When shopping for fresh or thawed scallops, look for ivory or creamy-colored meats, even as dark as a light tan; a stark, bleached white can be a sign of heavy phosphate treatment. There should be little or no milky liquid in the tray, another sign of heavy soaking. In fact, the best dry-packed scallops are often a bit sticky. A fairly strong sweet-briny aroma is also not a problem, but a fishy or sour smell indicates spoilage.” 


Jay sums up how to cook scallops in one simple sentence. “One of the best ways to treat scallops is like little filets mignons -- seared in a hot skillet until the outside is browned and a little crusty, and the center is anywhere from rare to medium rare.”  Thank you Jay. I couldn’t have said it better myself.


Scallops with Orange and Onion Salad
Adapted from Food & Wine – makes 8 first course servings or 4 “small plate” meals

4 large navel oranges (or ruby red grapefruits)
3 tablespoons drained pickled cocktail onions
2 tablespoons packed flat-leaf Italian parsley leaves
Freshly ground black pepper
1 ½ pounds sea scallops, preferably dry pack
Kosher salt
1 tablespoon extra-virgin olive oil, plus more for drizzling

Using a very sharp paring knife, peel the oranges, removing all of the bitter white pith. Carefully cut in between the membranes to release the orange sections into a bowl. Discard all but one tablespoon of orange juice from the bowl. Stir in the drained pickled cocktail onions and parsley leaves and season with freshly ground black pepper and set aside.

Pat the sea scallops dry with a paper towel and season them all over with salt. Heat a large, non-stick skillet over high heat until very hot. Add one tablespoon of olive oil and heat until it is shimmering. Cook the scallops over moderately high heat, taking care not to crowd the scallops in the pan. Turn once until they are crusty brown and just cooked through, about 3 - 4 minutes total, depending on the size of the scallops. Do not overcook the scallops or they will be tough and rubbery. Remove them immediately from the pan onto a clean paper towel.

Spoon the pickled-onion-and-orange salad onto small plates and arrange the scallops around the salad. Drizzle with extra-virgin olive oil, some freshly ground black pepper, and serve at once.


Wednesday, February 2, 2011

Seared Tuna With Ponzu Dipping Sauce


There’s a new wave of entertaining popping up in homes throughout the world. It’s called the coffee-table movement. More and more people today are serving small, healthy dishes that are perfect for chic, informal meals served around the coffee table. Hence the name, coffee-table movement. Depending on where you live, these little dishes may be called antipasti, appetizers, tapas, mezze, sushi, or simply finger food.

In the introduction of her delightful cookbook Small Bites, author Jennifer Joyce explains, “There’s a revolution going on. The formality of the dining room is being exchanged for a more relaxed gathering around the coffee table as a new mode of entertaining. Growing numbers of home cooks are unashamedly offering guests simply a selection of canapés and appetizers as a main meal. They are dismissing the classic three course scenario with large cuts of meat and fish in favor of diminutive yet beguiling small bites.” 


These little small bites, or appetizers if you wish, are especially suited for those who want to entertain stylishly, but live in a small space without a dining room. They are also perfect for those of us that wish to eat less but not compromise on quality.

This seared sesame tuna is a perfect of example of small bites that can be served around the coffee table. The tuna is best prepared the night before so it is firm to cut, making it easier to slice. The ponzu sauce can be made on the morning of the serving day. Of course you could purchase the ponzu sauce, but why when you can throw it together in a matter of minutes.

When we lived in the Bahamas, tuna was on our menu frequently. Our favorite way to prepare freshly caught tuna is to make a simple raw tuna tartare and serve it as an appetizer with crackers. This is a picture of my husband and his friends with their catch at the dock, still dripping with salt water. It took two men and a boy to boat this big boy. So unless you’re lucky enough to catch your own, be sure to buy really good top quality sushi grade tuna – ruby red with a little white marbling throughout – and for heaven’s sake, please don’t overcook it.


Seared Sesame Tuna With Ponzu Dipping Sauce
Adapted from Small Bites by Jennifer Joyce – makes 8 small appetizers or 4 small meals

1 ½ pounds best quality fresh tuna, preferably from the tail
1 tablespoon extra virgin olive oil
½ teaspoon each kosher salt and freshly ground black pepper
1 teaspoon black sesame seeds
1 teaspoon white sesame seeds
4 scallions, white parts and some green, cut into matchsticks
1 Granny Smith apple, (or apple of your choice), cut into matchsticks
1 European cucumber, peeled and seeded, cut into matchsticks
Green scallion tops for garnish
Ponzu dipping sauce, recipe below

Cut the tuna lengthwise into 2 – 3 long slices, 2” wide, like you would small beef fillets. Heat a large, non-stick sauté pan on medium high heat. Meanwhile, rub the tuna with the olive oil, then roll it in the salt, pepper and sesame seeds. Place the tuna fillets in a dry pan and sear until brown on all sides, taking care not to overcook – the meat should be raw inside.

Allow the tuna to cool slightly, then wrap them very tightly in plastic wrap. The more tightly it is wrapped, the firmer it will be to slice. Refrigerate for at least an hour and preferably overnight so it’s firm to cut, making it easier to slice.

Unwrap the fish and slice very thinly, about ¼” thick. Arrange on a bed of scallions, apple and cucumber on individual plates and top with tuna slices. Garnish with some of the green scallion tops. Serve accompanied by the ponzu sauce for dipping.

Printable recipe including ponzu sauce


Ponzu Sauce
Be sure to zest the lemon before squeezing

1 cup low sodium soy sauce
4 tablespoons sugar
Juice of ½ lime and ½ of lemon
1 scallion, chopped
Zest of ½ of a lemon for garnish

In a medium-sized saucepan, heat the soy sauce and sugar until the sugar dissolves.  Add lime and lemon juice and allow to cool to room temperature, then stir in chopped scallion. Garnish with lemon zest.

Tuesday, September 28, 2010

Salmon cakes with wasabi mayonnaise - a delicious twist on crab cakes


As I flipped through my latest cookbook, Williams-Sonoma’s New Flavors for Appetizers, I saw a recipe for salmon cakes. I said to myself as I looked at the beautiful photograph, these look just like crab cakes except they’re pink inside.  

They are a perfect alternative to pricy lump crab cakes. Made with cooked salmon, they are a snap to put together. We served them for light dinner on a bed of baby lettuce mix, but their original purpose, as you can guess by the name of the cookbook, was for appetizers.


Believe me, these cakes in no way resemble your mother’s salmon croquettes from your childhood that she made with canned salmon and deep fried. I gently pan sautéed them in a few tablespoons of grapeseed oil. Although grapeseed oil is expensive, it doesn’t contain any transfats and has a neutral taste which doesn’t interfere with or overpower the delicate flavor of seafood. It’s also nice because it can be heated to a high temperature without burning. Feel free to substitute another transfat-free neutral tasting oil, such as canola or safflower oil, if you wish.

When you make the cakes, don’t be tempted to mix them in the food processor. It will quickly make mush of them. It’s also important that you let the cakes rest in the refrigerator for at least thirty minutes so they become firm, otherwise they fall apart while you’re cooking them. I’ve also included a recipe for our favorite way to cook salmon that turns out perfectly every time.

The simple mayonnaise sauce with zesty wasabi is tempered by the sweet honey and tart lime, giving it an Asian flair. It would also be excellent with crab cakes.


Asian style salmon cakes with wasabi mayonnaise
Adapted from Williams-Sonoma New Flavors for Appetizers
Makes 6 cakes – 3 to 6 servings

½ pound cooked wild salmon, skin removed (see recipe below)
1 tablespoon minced yellow onion
1 cup Panko bread crumbs
Kosher salt and freshly ground black pepper
1 tablespoon good quality mayonnaise or my homemade, link here
All purpose flour
1 egg, beaten to blend with a dash of Tabasco or other hot sauce
Grapeseed oil, or any transfat-free neutral tasting oil
Baby lettuce mix

Wasabi mayonnaise:
1/3 cup good quality mayonnaise, either homemade, link here, or Hellmans
1 teaspoon wasabi paste (the tube variety)
½ teaspoon honey
1 teaspoon freshly squeezed lime juice

Place the cooked salmon in a large bowl and flake with a fork. Add the onion, ½ cup of Panko bread crumbs, a little kosher salt and freshly ground black pepper and about a tablespoon of mayonnaise and mix gently until it comes together. Add more mayonnaise if needed to bind the cakes. Now remember that I don’t recommending using a food processor, because the mixture will turn to mush.

Using your hands form into six equal cakes. Place on a plate, cover and refrigerate for at least 30 minutes for the cakes to become firm. It’s important to chill the cakes or they will fall apart when you sauté them.

In the meantime, whish together the ingredients for the wasabi mayonnaise and store it in the refrigerator until you’re ready to serve the cakes.

When the cakes have chilled sufficiently, remove them from the refrigerator. Place the flour, beaten egg and remaining Panko crumbs in three separate bowls. One at a time dip the cakes in the flour, then the egg mixture and finally the crumbs, shaking off any excess in each step.

Heat two to three tablespoons of grapeseed oil in a 14” non-stick skillet over medium high heat. Carefully add the cakes to the skillet and shallow fry until golden brown on the first side, then turn and brown the other side, taking care not to let them burn. It should take about four to five minutes total cooking time. Remove cakes to a plate.

To serve, arrange a handful of baby lettuce on each plate and top with a crab cake. Dribble each cake with some of the wasabi mayonnaise and serve right away.

Cook's notes: If you find you need more mayonnaise to bind the ingredients together as one reader suggested, please add accordingly. Also be sure to refrigerate the cakes prior to cooking to help them stay together when you sauté them.


Simple Broiled Salmon
Serves 2

Wild salmon fillet, ¾ pound, preferable with the skin left intact
1 tablespoon grapeseed oil, or any transfat-free neutral tasting oil
Kosher salt & freshly ground black pepper
A few crushed pink peppercorns give it a nice twist (optional)
A squeeze of fresh lime juice

Put salmon in a dish; rub with oil, salt & pepper generously and let sit at room temperature for ten to fifteen minutes. Preheat the broiler.

Arrange fish, skin side down, on an unheated sheet pan lined with heavy duty foil for easy clean-up. Place the fish under the broiler about three inches from the source of heat. Broil 8 to 10 minutes or just until it is cooked through. It’s not necessary to turn the fish. If it starts to get too crispy on the top, change from broil to bake and bake at 400 degrees until done. Take care not to overcook or it will dry out. Remove from the oven and carefully remove the skin with a sharp knife. Squeeze with a little fresh lime juice. If not serving right away, let it cool and refrigerate, covered. It can be kept for a day or two in the refrigerator in a covered container.